Lift Chair Assembly: A Safe Step-by-Step Guide

The chair has arrived, the carton is open, and someone is ready to try the lift button. Before anyone sits down, there's more to check than whether the back looks attached. The chair needs to fit the room, support the person using it, and move safely under their weight.
We treat lift chair assembly as a room-and-body safety check, not just a furniture project. A passed occupied test is the finish line, provided the empty-chair checks pass first and the user can participate safely.
Specs to Confirm Before You Build
Before opening the hardware bag, match the chair's model label to its manual. Similar-looking chairs can use different back attachments, power connections, and clearance requirements. Use the exact model's instructions for setup.
| Check | Spec | Why it matters |
|---|---|---|
| People to position the chair | Two adults | The frame is heavy, and the lift path can be awkward. |
| Bolted back fasteners | Follow the manufacturer's specified torque; resolve conflicting units before tightening. | A loose back can detach under load. |
| Rear clearance, chair seated | About 30 in (76 cm); confirm the model's requirement in the Pride Mobility placement manual. | The chair may strike the wall as it reclines. |
| Power connection | Wall outlet; no extension cord | This avoids unsuitable power arrangements and unnecessary cord runs. |
| Transformer | Open, ventilated location | Room air around the transformer helps prevent heat buildup. |
| Capacity | Follow the limit printed on the chair's carton. | Assembly cannot make an overloaded chair safe. |
| Floor | Dry, level, firm | An uneven floor can make the chair rock and interfere with lifting. |
With help, move the chair to a dry, level spot near the outlet it will use. Lift it only at the points identified by the manufacturer. The handset cable, footrest, and upholstered back are not lifting points.
Check the hardware specification carefully
For certain bolted backs, the Pride T3 assembly manual prints a tightening specification of 12 ft-lb (53 N·m). Those units do not match, so the printed pairing cannot serve as a reliable conversion. Confirm the correct torque for the exact model with the manufacturer or a qualified installer before tightening.
Use the specified torque wrench when the manual gives a torque value. Keep the chair unplugged until the back is secured. For a click-lock back, follow the model's locking-bracket procedure instead.
Gather these tools and supplies:
- Phillips screwdriver: Use the correct tip to avoid damaging screw heads.
- Adjustable wrench: Hold compatible nuts or fittings without crushing nearby cables.
- Torpedo level: Check that the base is level, then test the chair for stability.
- Flashlight: Inspect brackets, cable routing, and the space beneath the chair.
- Supplied hardware bag: Compare its contents with the packing list; household screws may not fit.
Measure the actual carton, assembled chair, and moving envelope. A listing for a transfer lift chair does not provide a room-planning template for an upholstered lift recliner.
Keep the transformer exposed to room air, with its cord clear of the chair's moving parts. Our lift chairs for seniors guide can help with selection; use the exact model's manual for installation. Our Grants Pass team includes these checks in every white-glove setup.
Fit the Chair to the Person and Room
Say a Southern Oregon homeowner has chosen a lift chair for a front room with a narrow entry. The carton clears the porch door, but the hallway turns sharply beside a console. Even after the chair reaches the room, its footrest could block the only comfortable route to the kitchen.
That's why delivery access and everyday accessibility need separate checks. Older Grants Pass houses can have tight turns, and homes in Medford, Central Point, and Ashland can present the same problem regardless of their age.
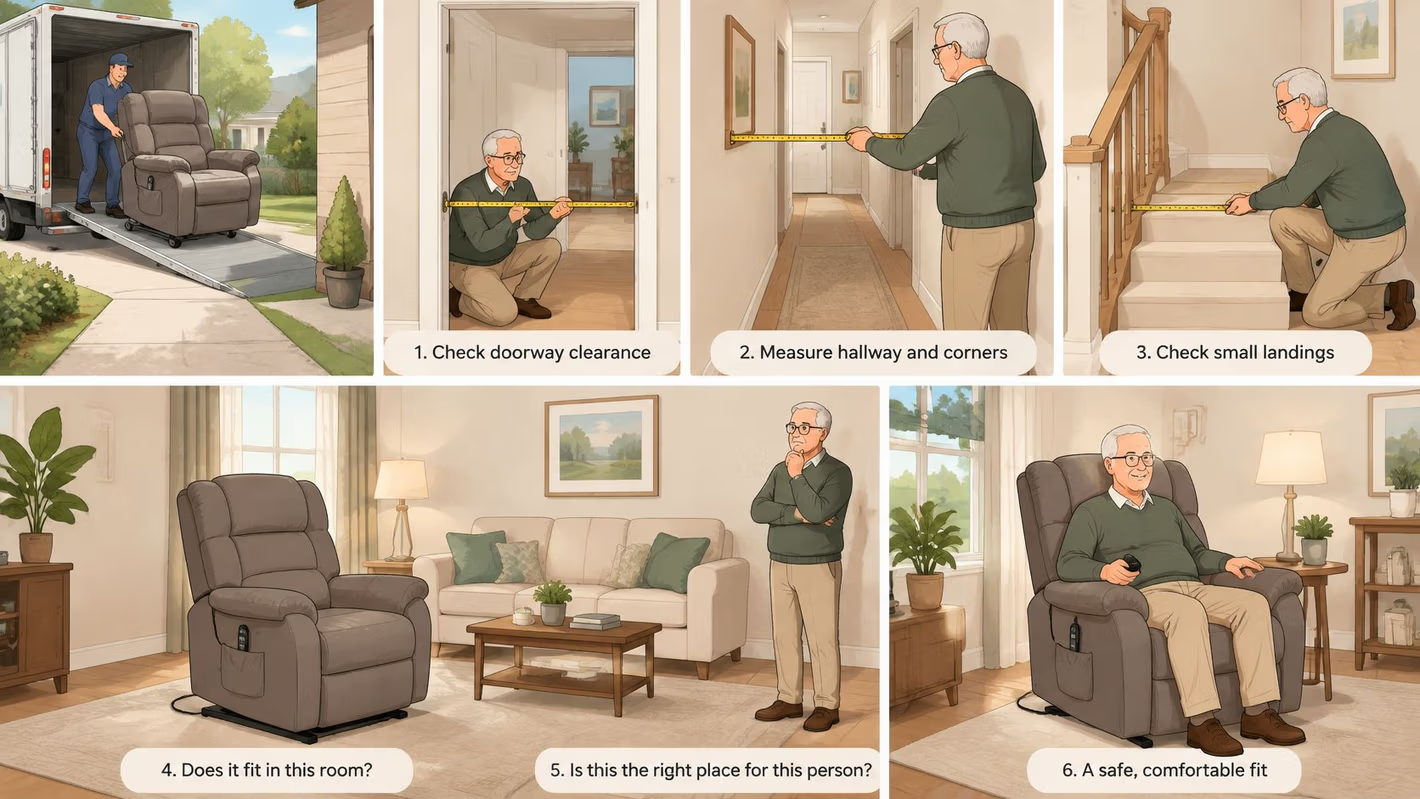
Follow the entire delivery path
Measure the usable doorway opening with the door positioned as it will be during delivery. Include hallway turns, stair landings, projecting trim, and the space needed for the people carrying the chair. Our furniture measuring guide helps organize those measurements before delivery day.
Inside the room, leave open floor ahead of the chair for the extending footrest and the user's rising motion. A coffee table that clears the closed chair may obstruct the footrest, while a side table can interfere with the user's hand or walking aid.
- Walking route: Keep power cords out of routes to doors, bathrooms, and frequently used furniture.
- Transfer space: Allow room for the user's usual mobility aid without requiring an awkward turn.
- Floor covering: Remove a loose rug or curled edge rather than expecting the user to step around it.
- Everyday items: Position the remote within easy reach without stretching across the moving chair.
Fit the seat to the person
A chair can fit through the door and still be wrong for its user. A review of home lift and accessibility technologies identifies mismatches between systems and individual needs, reinforcing the importance of checking the person as well as the installation.
With the chair in its normal seated position, check that the user's feet are supported and that the seat doesn't force an uncomfortable posture. During a supervised rise, the user should be able to move toward standing without lunging forward or sliding unexpectedly.
If that movement requires pulling on a nearby lamp table, the transfer arrangement needs attention. A clinician or occupational therapist can help when balance, strength, or transfer technique makes the fit uncertain.
A chair that reaches the room isn't yet a safe transfer spot.
Plan for an interruption in power
Without a functioning backup system, a powered chair won't lift during an outage. Some backup arrangements provide limited emergency movement rather than normal, repeated use, so the owner needs to understand the exact model's capabilities.
An optional battery pack is a separate product with its own instructions and heat risks. Recalled recliner and lift-chair packs have included overheating hazards; don't assume that any compatible-looking pack is suitable.
Charge only as directed, keep the pack where its instructions permit, and stop using a pack that is hot, swollen, damaged, or recalled. Finally, check the complete movement envelope: if a rise meets a wall, lamp, or rug edge, rearrange the room before the first real transfer.
How to Assemble the Lift Chair
The attachment system determines the assembly method. A click-lock back shouldn't be treated like a bolted back, and neither should be forced into place because the upholstery appears aligned.
Keep the model-specific manual beside the chair throughout the work. Our overview of power reclining seating types explains the broader categories, but it doesn't replace the assembly directions supplied with a particular chair.
Unpack and identify the attachment system
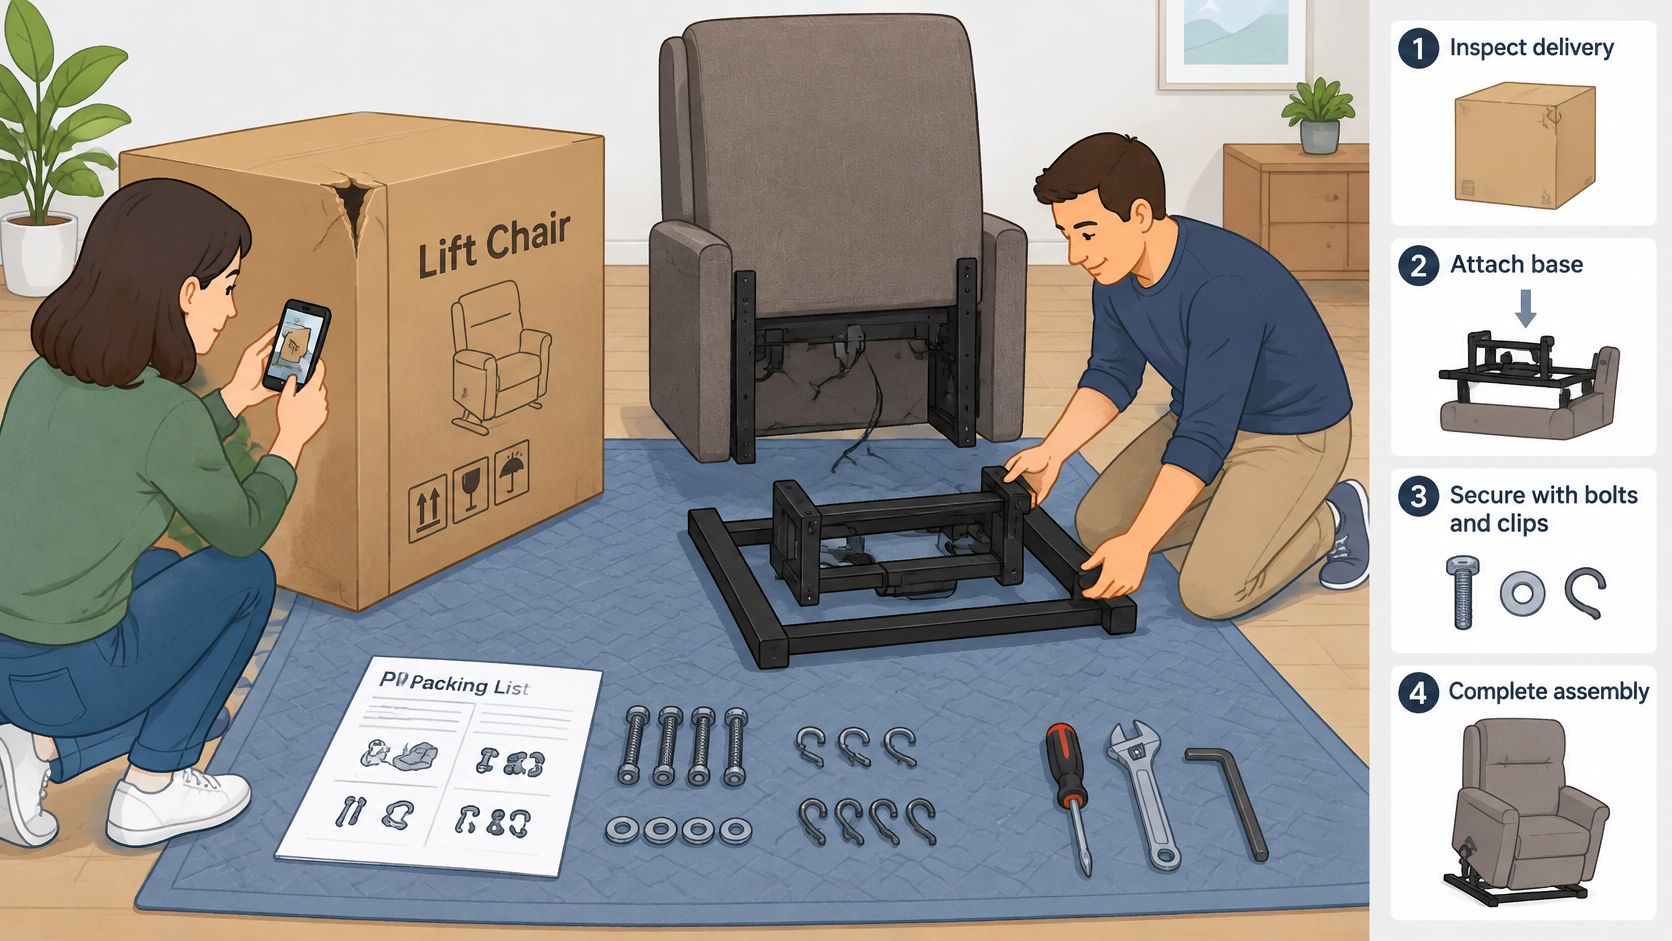
Open the carton on a non-abrasive pad so the frame and upholstery stay protected. Cut packaging cautiously, away from fabric and wiring, then match the bolts, clips, washers, and loose components to the packing list. Photograph crushed packaging, bent brackets, torn upholstery, or damaged connectors before breaking down the box. Stop if structural or electrical damage is visible.
Position the base with help so nobody has to balance the chair while reaching for loose components. Keep the removable back, any separate arm panels, transformer, and handset cable apart. Lay connectors where they can be identified without placing them beneath the base. Don't use the moving mechanism as a handle.
Attach a click-lock back using its bracket sequence so both sides engage fully. The Pride Mobility owner's manual directs installers to position the locking clip vertically, route the hand-control cable over the base and through the rear, slide the back onto its brackets, and press until both sides click. A single missed click leaves the back unsecured while the lift operates. If the back won't seat, lift it away as the manual permits and inspect the alignment rather than striking or forcing it.
Secure the back before connecting accessories
Use the bolted-back procedure only when the model calls for it, because attachment details aren't interchangeable. The T3-style sequence provides access at the footrest, removes the back nuts, releases the actuator's shipping wire tie, aligns the threaded back bolts with the base brackets, and reinstalls the nuts. Confirm the correct torque before final tightening. If accessing that position requires powered movement, or the manual's sequence is unclear, have a qualified installer complete the work rather than improvising around a raised mechanism.
Connect the hand control and any heat or massage harnesses after securing the back so seating the back can't trap an already-connected cable. Match the connector shapes and alignment marks without forcing the pins. Fasten the hook-and-loop flaps beneath the base where directed, keeping fabric away from moving joints. Never substitute a similar-looking power supply or connector.
Start remaining assembly screws loosely so all attachment points can align before tightening. Square the parts, then snug the fasteners evenly using the tool specified by the manufacturer. A screw that resists immediately may be cross-threaded; back it out and realign it instead of applying more force. Avoid a power drill for final tightening unless the manual expressly calls for one.
Keep fingers, tools, loose fabric, and low-voltage wiring outside the scissor mechanism so nothing becomes trapped during testing. Inspect from outside the moving frame with a flashlight. Leave the chair unplugged until mechanical assembly, connector identification, and cable routing are complete.
Assembly rule: If a part needs force to overcome poor alignment, stop and find the cause before continuing.
Keep the manual and unused supplied parts together after assembly. An unexplained leftover fastener deserves investigation, not disposal. Packaging can wait until the chair passes its functional checks and no damage needs documenting.
Test the Lift and Fix What Fails
Power working isn't the same as safe. A motor can run while the back remains incompletely engaged, a cable stretches under movement, or the base rocks on the actual floor.
A CPSC power-recliner recall notice describes a back that could detach when weight was applied as the chair returned upright. That is a product-specific recall, not evidence that every lift chair has the same defect. It does explain why an unloaded motor test alone isn't a sufficient handoff.
Follow a pass-or-stop routine
Verify the back attachment. Inspect every required lock or nut, then gently check the back by hand using the manufacturer's prescribed method. Upholstery movement isn't the same as bracket movement. Any lifting or separation at the attachment stops the test.
Trace every cable. Follow the handset lead, accessory harnesses, and low-voltage supply cable from end to end. Allow the routing and slack specified by the manual without leaving a loop inside the moving frame.
Connect power with the controls untouched. Seat the low-voltage connector as directed, then connect the supply to the wall outlet. Keep the plug accessible so power can be disconnected without reaching under the chair.
Run an empty-chair test. With children, pets, blankets, and tools clear, operate the full lift and recline travel, then return to seated. Watch from outside the mechanism and release the control at any unexpected sound, hesitation, or contact.
Check floor contact. Confirm that every intended leveler or support rests securely on the floor. The chair must not rock, shift position, or lean as its geometry changes.
Perform an occupied test only after everything else passes. Use the intended occupant, within the chair's rated capacity, and arrange appropriate assistance for their mobility needs. Observe the back as weight transfers, the user's foot placement, and the transition toward standing. Don't use an occupied test to investigate a suspected fault.
Stop at any grind, lean, pinch, or separating back. Release the control and disconnect power when safe. Never crawl beneath a raised chair, reach into loaded linkages, or force the footrest closed.
If someone becomes stuck, prioritize their safety rather than the troubleshooting sequence. Get suitable assistance instead of trying to pull them out through an unstable transfer.
Match the symptom to a limited check
New lift chair symptoms and safe fixes
| Symptom | Likely cause | Safe fix |
|---|---|---|
| No movement at all | Loose low-voltage plug or unsuitable extension-cord arrangement | With power disconnected, reseat the plug and use a wall outlet |
| Back shifts on one side | One click or one nut missed | Unplug and correctly secure both sides; stop if engagement or torque remains uncertain |
| Jerky or stalled rise | Cable, blanket, or object in the scissor path | Unplug; clear only safely accessible obstructions without entering the mechanism |
| Chair rocks while lifting | Raised leveler or rug edge | Adjust levelers as directed on a firm floor |
| Remote dies after one move | Harness displaced or trapped during back installation | Unplug, confirm the back attachment, and reconnect an undamaged harness |
| Reclines but will not return upright | Obstruction or interrupted movement cycle | Clear the accessible path; attempt an empty cycle only if safe, then stop if unresolved |
These are assembly-related possibilities, not diagnoses. A failed control, damaged actuator, or product defect can produce similar symptoms, and an extension cord isn't proof of the cause of a no-power condition.
Stop point: A fault that survives a careful recheck belongs with professional service, not repeated button presses.
A setup mistake is something identifiable and correctable, such as an incompletely seated connector. A chair that still fails after the correct setup has been confirmed may need parts, product-specific service, or a recall check. Keep the handoff standard at zero unresolved safety items.
For outage planning, our lift-chair battery-backup guide helps identify the questions to ask about the installed system. Don't attach an unapproved pack as a troubleshooting experiment.
Moving the chair to another room also requires planning. For a separate heavy-appliance move, Best London Removals Ltd.’s guide to move a washing machine safely is a useful task-specific resource; appliance instructions should never substitute for the chair's handling directions.
Send any unresolved symptom to our in-home service team. Keep a description of what happened, the model label, and photographs of accessible connections ready, without operating an unsafe chair to make a recording.
Book White-Glove Setup or Visit the Showroom
A lift chair is ready when it fits the room, suits the person using it, and passes an occupied operation check. If the instructions are unclear, safe handling help is unavailable, or the final check raises a concern, arrange professional setup.
Our professional furniture delivery and assembly service can help with carrying, assembly, and placement. Our crew carries the chair into the home and sets it up.
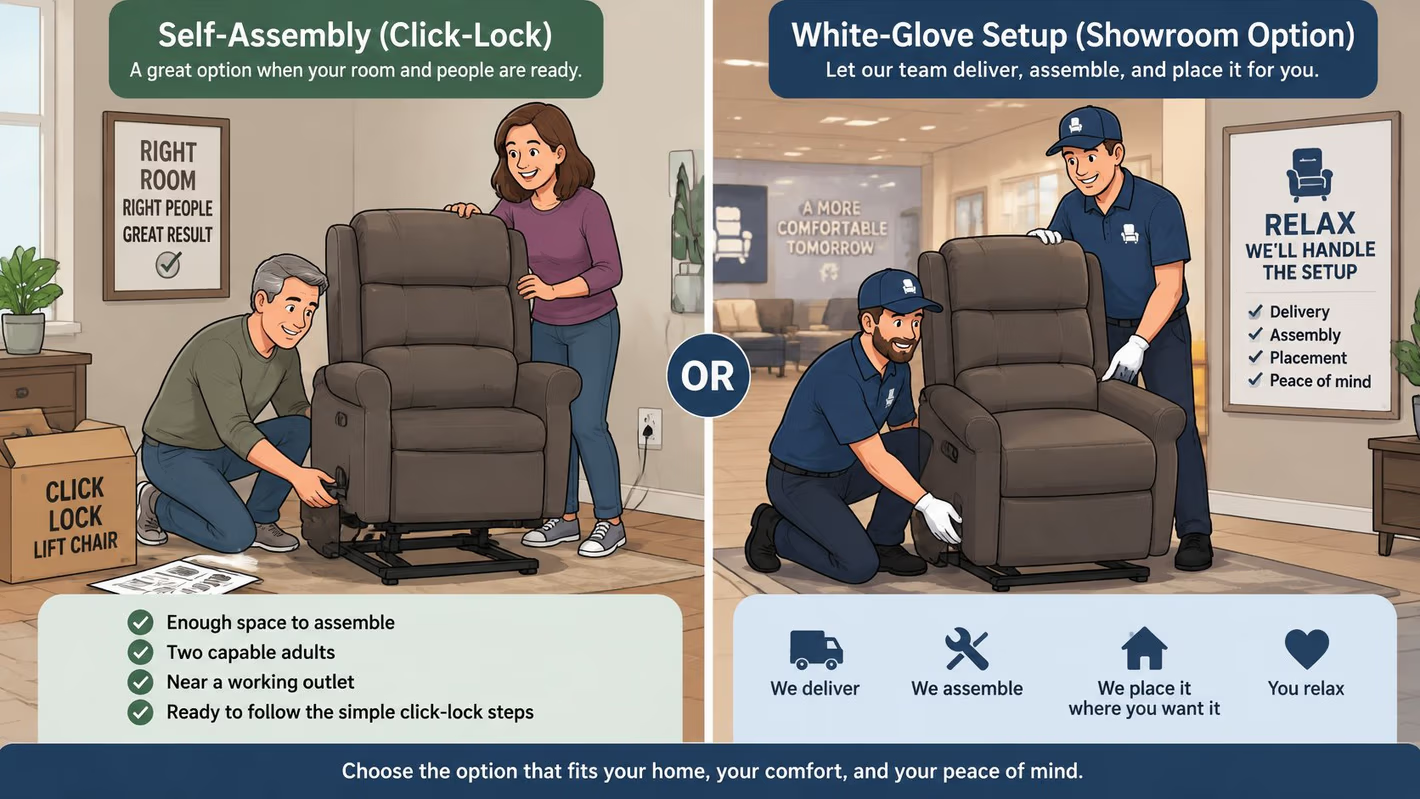
What professional setup should include
Our white-glove crew checks the chair for shipping damage, assembles the back and controls, and routes wiring clear of moving parts. They check lift and recline operation and confirm the chair's placement leaves room for safe movement. Packaging removal leaves the room ready for use.
- Before assembly: Inspect the delivered components and identify the model's attachment method.
- Before handoff: Check movement, controls, floor stability, and usable transfer space.
- For the household: Explain normal operation, the accessible power connection, and when to stop using the chair.
- When replacing a bed: Ask about mattress haul-away as part of the delivery conversation.
Try the transfer before choosing the chair
A showroom visit lets the person who will use the chair check its comfort and operation before choosing. Our family-owned business began in 1946 with George Gates' promise of “Service and Value.” We carry that service into helping customers consider fit and understandable controls, not just appearance.
Our 30,000-square-foot Grants Pass showroom gives Southern Oregon neighbors space to try seating. Bring room measurements and discuss the delivery route with our team.
Our selection includes seating from La-Z-Boy, Flexsteel, and Ashley, along with Beautyrest sleep options. Gates Unique Finds include reclaimed wood, teak, and one-of-a-kind statement pieces. Keep other furnishings clear of the chair's movement and transfer space.
Gates Easy Pay terms include $0 down and six equal payments, no-interest options if paid in full within the promotional period, and no-credit-needed financing and lease-to-own programs. Our team can explain available arrangements alongside delivery and setup.
At Gates Home Furnishings, we offer lift-chair guidance, professional assembly, and in-home placement that considers both the room and the person. Visit our Grants Pass showroom with room measurements to try seating and discuss setup, or browse our inventory online.